Monday, February 28, 2011

Earth Therapeutics: Product Fail


Hey Chicas!

So Starting on Thursday night around 8pmish right after Vampire Diaries (which I have some bones to pick..but not the topic of this post), I just got hit with a MAJOR headache.  I'm talking huge, like just a pounding constantly on the left side of my head, but at first it didn't move around.  It is now Monday, and I'm still suffering from this flipping headache.  I'm talking not leaving the house since Thrusday morning when I went to the Scotties.  Its freakin' brutal.  I have been drugging myself with Tylenol Extra Strength, and taking the most that I can in a 24 hour period. 

Now on Saturday morning it wasn't too bad when I woke up.....but then 2 hours went by and, yup you guessed it it was back, full force.  Now yesterday I was good until 2ish in the afternoon then it came back.  But now its like to back of my left ear, and coming around the front of my face as well.  So obviously something is not too good in my head, perhaps sinus or something.  But this is not a normal migraine or headache. 

So I have picked up Earth Therapeutics Soothing Beauty Mask....got it at Winners for like $8 a while ago.  So I figured that this would be the best time to really test it out.  It claims to be able to "Use our Soothing Beauty Mask chilled in the refrigerator to provide quick, reliable relief for strained, puffy eyes. Also great over forehead for temporary headache relief.  The unique gel formulation retains temperature longer than water-based fillers, harmonizing with the body's natural flow to soothe, relax and invigorate.  With adjustable velcro fastener to fit most head sizes."

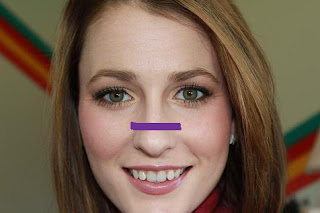
First off, it does stay cool for a long time, but does it relive any pain....nope not mine at all!  The major issue in there is not enough space for my nose.

The purple line demos where it sits.  It not comfortable, at all!  To have it that low and still be able to touch my eye area, it failed miserably.  If it was cut higher it would be soo much nicer.

Recover-E Cucumber Eye Pads
The next night while I was having a bath, trying anything to relive the pain, I thought I'd try the eye pads.  They state "Infused with real Cucumber extract, Vitamin E, and a beneficial blend of nutrients, these pre-moistened treatment pads cool and soothe on contact - offering a convenient, one-step solution for comforting and replenishing the delicate skin around the eyes. Cucumber, Aloe Vera, and Chamomile soothe, condition, and calm - while Vitamin E and Green Tea polyphenols are natural, yet powerful anti-oxidants that help skin to recover from the damaging effects of mental and environmental stress. Used regularly over time, these treatment pads help restore the skin. Tired eyes are pampered. Tired skin is nourished and nurtured. Puffiness and swelling are relieved. Dark circles are visibly diminished. Your skin will look as good as it feels ... rested, fresh, and radiant."


A lot of talk for a whole lot of nothing.  I think you'd get better results with an actual cucumber.  First off, you would actually need to keep them chilled, because as they are, they are not cold.  Cool maybe, but not cooled.  There is a good amount of product on the pads, and they stay on your eyes well.  But for thier soothing abilites....little to none.

So they both failed.  If you want the eye pads just for relaxing, then go for it, it did feel nice.  But for any actual results, don't expect any. 

I'm still looking for some way to remove this damn headache thingy.  Let me know if you guys have any tips.

Caitlin xoxo
Friday, February 25, 2011

Nail Care: Apply Polish like a Pro

Hey Chicas!

Some of you may be thinking "FINALLY", and others maybe be like "YAH".  Either way this is the last one.  How to apply polish, you know a good manicure can be won, or lost in application.  Its what you and everyone you meet sees, not the prep work, but the final coat.


So if you aren't a typical watcher of my channel....well you totally need to start.  There are some tips and tricks on my videos that you can't really put into words...so I'll do my best.

Applying polish...
1.  Wait until your base coat is dry to apply polish (more tips on video)
2.  Wait 5-10 mins between polish coats to ensure good bondage
3.  Don't apply top coat until polish is at least tacky, and even better almost dry
4.  Test for dry nails by lightly tapping your pinkies together, if they stick not dry, if they don't they are dry.

Biggest tip I can give you..
I always do my nails over 2 night.....I know its crazy but trust me it works.  I do all the prepping of my nails in one evening, and then the painting the next.  The prepping gives your nails a nice shinny finish and smooth cuticles, this gives your nails a wonderful appearance, and you won't feel strange by having naked nails.


In order to get the polish on really well and ensure your polish isn't streaked, please watch the video and its best the demo this than just typing it out.  I will help you get nails looking that the above!
      
I hope that this series was helpful you guys!  If it was please please leave a comment, and let me know how it turned out for you.
 
Caitlin xoxo   

Wednesday, February 23, 2011

Nail Care: Prep your Nails for Polish

Hey Chicas!

So, we are back on track with my nail care series.  On to video 3 of 4, how to prep your nails.


Some of the tips mentioned in the video, I'll highlight on here, in case you aren't a youtuber
   
First off get your things all in one area.....as such

This I showcased in the first video on implements, but it is super helpful to keep everything in one place, plus its an easy grab to take down with you to watch TV.

Second you need to get your area ready for working on your nails....

I always use a towel, mine is white, and then I line up my implements on the side so I can just work through the different stages.

Steps (for more tips you'll have to watch the video..hehe)
1. Cut your nails
2.  File your nails (crystal is best and always in one direction)
3.  Wash your hands (watching the video will explain this to you)
4.  Use birchwood stick to free any rough edges that have filed under your free edge
5.  File your nails lightly
6.  Apply your choice of cuticle cream/oil
7.  Push back your cuticles (once a month) with cuticle pusher
8.  Carefully cut your excess cuticles off  (once a month) with the cuticle nippers
9.  White Buff your nails (once a month)
10. Black Block Buffer
11. Your shiny buffer (2 sided are best)

Your done!  All you have left to do now is paint them a pretty little color.  (awesome segway into the final part of the series)...Check back to tomorrow.

Caitlin xoxo

Monday, February 21, 2011

Islander Day

UPDATED
I hope that your day is turning out to be better than mine!  I had the biggest amount of anxiety, stress, and fear.  For those of you who don't know, I have a puppy (technically a dog an old one around 13 yrs old)He is a miniature poodle,  they have a tendency to develop cataracts, hence he is pretty much blind.  This tends to led to different issues, such as if a chair is moved he'll bump in to it, and can get lost and confused of his surroundings really easily. It is not fun in winter as he usually uses the grass, pavement and gravel outside in the yard to determine where he is....the winter well the snow kinda removes that extra assurance of his location.

Well thank god for good Samaritans!! Seriously, some times when you do something that seems, totally trivial to you, is beyond huge to the person on the receiving end.

A lovely lady in a truck comes up the house and knocks....I have no idea who it is.  She asks if we are missing a little white dog, because there is on the road (and when we say road we mean the TCH). And I immediately answered "Nope!", because how can you lose a dog, especially when you are in the country.  But we think about it, and where is Rylee?  He was not in the house! Crap, it was Rylee, she was talking about.  I immediately go to put on my boots and about to run out the door to the road to get him, she had picked him up (even though he bit her) and put him in the truck, and was trying to find the owners.  The feeling that went through me when I thought that my puppy was on the road, he could have been killed. He is white, and blends in to snow, first off.  Second off, how the hell did he make it all the way down the lane, (cuz, it ain't a short one) and one to road, he can't really see.  So he obviously got confused and thought he was walking to the house when in fact he was walking to busiest road on PEI.

Bottom line he is fine, 100% A-OK.  But just think what could have happened if she hadn't gotten him.  So one small little gesture likely saved my puppy, so just considered that next time you are trying to decide whether you should do it or not.  Always do something if it is going to be beneficial to the receiving party! 

Just thought that I would share this little stresser of my day today with you guys!  And again, hope yours is better than mine, and if not, I hope it ends well!


Hey Chicas!

Today on Prince Edward Island is Islander Day!  A provincial holiday which is similar to other provinces Family day.

I hope that you enjoy time with those you love, and just sit back and relax.

http://www.marriedtothesea.com/archives/2011/Feb/
That's what I'm doing today.  Slept in, made pancakes for the fam....so I hope you enjoy my lack of actual post.

But don't worry the nail series will continue!

Caitlin xoxo

Saturday, February 19, 2011

Nail Care: Polish

Hey Chicas!

Part 2 of the Nail Series: Polish

I discuss the pros and cons of professional polish vs. drug store polish.  I would really recommend that you watch the video as I can be long winded and can't type the same way I can talk! :)

I also discuss the importance of a good quality base coat, and what to look for in one. My fav is
OPI Matte Nail Envy

My choice for topcoat
Essie to dry for
Plus lots of other tips and tricks....click play to watch!


Check back for part 3 in a few days

Caitlin xoxo

Thursday, February 17, 2011

Nail Care: Implements

Hey Chicas!

So the first installment of the Nail Care series.

For starters, it is best to have all the nail things in one area, so you can simply grab it, and not spend hours (it has happened) looking for that buffer!

This is what I have found to work best.

I found it at Wal-Mart in the office supply section, its suppose to be for pens etc., but it is killer for nail files etc.  Plus it was only $10ish, and the mesh keeps things cleaner and less dusty, will not break the bank.

Please watch the video below for full details:


If you're a "just give the dets" kind of girl, here you go!

Proper Nail Care Implements:

1. Get round tipped nail clippers, and avoid the concave clippers (see pic)

2. Crystal Nail File
3. Birchwood Stick

4.  Any type of cream cream/oil/moisturizer for cuticle

5. Cuticle Pusher

6. Cuticle Nippers

7. Nail Buffers (2-3 types)

Be sure to watch the video, as I explain everything, and how/why I use them....plus you get to meet my special friend!


Please watch the video, I go into lots of details, and I really think it will be beneficial.

Caitlin xoxo

Wednesday, February 16, 2011

Nail Care All You Ever Wanted to Know Series!!!!

Hey Chicas!

I have had a lots of questions lately about nail care.  I think it all stems from the winter and have dry skin, and focusing on our hands more....hence our nails come into focus more too.

Well have I got a treat for you!!!!  I have four 4 videos all about nail care, from proper implements, to types of polish, how to prep your nails for polish, and finally how to paint your nails. 

I understand how some things would seem...shall I say....a little elementary perhaps, but important none-the-less.

I just wanted to have a little intro into what you will be seeing the next few weeks, and also give you an opportunity to ask questions about nails.

Let me have them!

Caitlin xoxo

Tuesday, February 15, 2011

Justin Bieber is still the Sh!t

Hey Chicas,

Since yesterdays post was a really cope out in the length I thought I'd throw up another short one.  I had mentioned in this blog post about how I purchased two Justin Bieber polish by Nicole by OPI.  You can read the previous blog post about "Step to the beat of my Heart" polish, but I wasn't overly impressed.


The second polish is called "My Lifesaver" and it is a soft blue-turquoise pastel color.   I had it on my fingers in the video Classic and Sexy Valentines Day Look if you want to see it in action!

Well first off, the polish is a wonderful color and great for a winter pick me up.  The brush is kinda crappy, I find it almost drags off color while it applys it. So then you get ridges in the nail polish, which maybe no one else notices this, but I hate it.  But to be honest I have found it in some of my standard OPI polishes as well, so its not just because of the Justin Bieber, it is just the luck of the draw with OPI I guess.  It lasted me about 4 days for sure, and I did get a 5th one out, but I should have really taken it off because it was fairly chipped.

So for about $10, the polish is ok, I actually took it back, because I was not happy with the polish consistency.  You can buy an OPI polish for about the same cost and it will be better quality.  I would recommend you pass on it, unless the color is exactly what you love, then go for it.  Its not horrible polish by any means, but I'm gonna stick with the professional quality polishes.

Caitlin xoxo

Monday, February 14, 2011

Happy Valentine's Day

Hey Chicas!

Well it is February 14th, 2011 today.  Whether you have a special someone to spend it with or family and friends, it is important to realize that you are surrounded by those that love you.  

Especially on V-Day you should feel loved and special.

Enjoy the day, and spread the love!


Keep on the look out this week for all you've ever wanted to know about nail care!!


Caitlin xoxo

Friday, February 11, 2011

Protect those Lips!

Hey Chicas!
I thought a very appropriate post the weekend before Valentine's Day would be about lips.  You want those suckers nice and moist for your kisses ;)

So I already did a video on how to make your lips look bigger and pouter....


But besides just making them look nice and kissable, you want them to be healthy and moist too.  The dry winter air and wind can really zapp the moisture right out of them.  The last thing you want to worry about is cracked lips.

If the standard lip balms aren't cutting it, and you have to reapply and reapply with no change in the moisture level.  I have the lip balm for you!

Recently I had supper dry lips, and the worse part was the corner of my lips had split, not the kind of look I'm shooting for, and I'm sure your not either.

This was the ONLY thing that saved them, and fixed them really in one application.  I applied a heavy coat at night and when I woke up, it was 90% healed!

The brand is Polysporin Lip Care, they have many different kinds.  The one that I used wasn't even the one designed for Lip Therapy, it was the Daily Lip Care, the orange one.  There is of course different variations made for different lip concerns But my big thing was that it was the daily one that fixed my lips, I can't imagine how good the hardcore ones would be.  I think  my next one will be Polysporin Daily Lip Protecion, the purple one.


I hope this helps you girls to get smooth, soft, kissable lips!

Caitlin xxoxxoxxo (extra kisses)

Wednesday, February 9, 2011

Skin Issues: Breakouts

Hey Chicas!

So, I have had the WORSE skin the past two weeks.  That's why I haven't put up any youtube videos lately, but that is no excuse for not posting about it.  The issue lays in the fact that what I did to my face, all by myself, i should know better and it shouldn't have happened.  No one likes to accept the fact that they screwed up, we all like to point fingers at someone else.  This though was all on me, and I've done it before, I totally new better, but went against my better judgment and did it anyway.  Don't do that ever!

Well, I'm now open to admitting it to you guys, that I messed up my face all by my freakin' self, horribly.

I hadn't had breakouts like that for years, honestly years!  They came on my cheeks, chin and then my forehead.   

So do we all want to know how stupid I was.........

You should never, never switch up your entire facial system at once, that causes your skin to go into overdrive and go flipping crazy on you.  So I bought new foundation which really blended in and worked well with my skin and wore well.  Then I bought new cleanser and toner combo.  The really stupid thing was changing them all at the same time, with in a day everything on my face changed except for my creams.

Needless to say my face didn't like it one bit!!  So I started breaking out, but when you change your facial cleaning routine, it will take your face at LEAST 2 weeks to adjust.  So in my mind they were just related to the new cleanser cleaning out my pores.  My chin always seems to have a few white heads and bumps so I was like "good its cleaning out my pores, awesome".  That lasted for a few weeks, and then the break outs started to move to my cheeks, and my forehead.  That was not really an area that I had issues at any time about my forehead.

So the cleanser is super gentle, because I'm trying something new, and it shouldn't irritate a baby's skin.  It was actually my fiance who suggested it might be the foundation.  And I was heartbroken, I really liked the foundation, matched my skin wonderfully, wore well, and was a really good price.  I shall do a review, when I'm sure it was that.  But I'm  like 99% sure that it was the foundation.  So I stopped using it, bought new foundation and guess what!?  The breakouts still came that were coming, but no new ones showed up. 

So a week of applying creams and trying to stop the breakouts, and clear my face up, I think I have finally succeeded.

I still have the acne spots and there are no new issues.

So, the moral of the story is....

Don't change it all up, just change one thing at a time.  That way you can pinpoint the cause of the breakouts.

Hope my mistake will prevent you from doing the same.

Caitlin xoxo

Thursday, February 3, 2011

Q & A: Dry Winter Skin

Hey Chicas!

We have been having a little cold weather on PEI lately and lots of snow...that is pretty rough on the moisture level of you skin.

I was asked by a follower of my blog what she could do with her skin.  She lives in Ottawa and nothing she does improves the dryness level of her skin.

My suggestion is a 3 part answer of sorts.
1. You need to exfoliate your skin, not just in the summer but in the winter as well.  If you have a layer of dry skin cells on your body, this will act as a barrier to any moisture that you put on it.  In order for the moisture to penetrate beyond the outer layer, you must remove the dry skin.  My favorite exfoliate is not a scrub....but a glove...the Renaissance Exfoliating Glove.


It is a 2 part package that you can find at most salons.  It now comes with a facial pad too.  All you need is your skin moist and the glove wet, and working in circular motion it will get off the dead skin.  It will hurt a little at first but your skin will get used to it.  I love this glove, I've had one for about 4 years..you can throw it in with your towels, and let it air dry...so easy!


2. The next part is not groundbreaking by any means, but it works!  Baby Oil, yuppers good old baby oil.  Now the key to this is when you are finished of your shower/bath, before you dry yourself, grab the baby oil.  Apply the baby oil all over your body (if your chest or back has issues with acne or breakouts, avoid these areas).  You should now be dripping with oil, take your towel and pat yourself dry.  No rubbing you want to help push the moisture into the skin.  Your skin will feel super smooth and moisturized.  It doesn't matter what kind of baby oil (ie, the smells) what ever you prefer, I like the Lavender :) 


3.  A good moisturizer, which is easier said then done.  I have a few that I continuously go back to. Now if you have one that you prefer that's totally ok. Hempz Cream is wonderful, you can always count on it to do the job well.  It is a little more expensive but I love them. Next is the Nivea Smooth Body Lotion or Dry or Extra Dry Skin, the key to this one is its a lotion not a cream, it will sink into your skin more, but it doesn't disappear it gives you a soft silky feeling.  The texture of it takes a while to get used to but by the end of the day my skin isn't dry.  The last one is Johnson Baby Lotion, I know some people will not like this, but I love it.  First of the smell is wonderful, you know it won't bother your skin, and with the different ones, there is sure to be one that you'd like.  Its not super super moisturizing but I always have one in the cupboard, because it is soo soothing!


So I hope that this helps you battle the winter dryness, and if you have any additional tips, leave them in the comments!


Caitlin xoxo